A leaking shower head is very annoying and calling the plumber again and again may not be feasible for all. There are many reasons why your shower head may be leaking and there are perfectly homely ways to fix it at once. Check out these possible reasons and try out the solutions given to fix the shower head.
Clogged Shower Head Holes
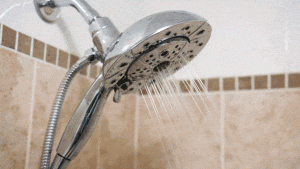
Often it so happens that the shower head holes get clogged due to deposit of dirt, lime and other minerals. This is a very common reason for shower heads leaking.
Solution:
The solution to this problem is very simple and even if you are unsure about the reason of the leak, you can try this as it is important to unclog the shower head holes at regular intervals.
- Turn off the main water line or the valve to the shower.
- Remove the shower head to soak it and scrub it to clean the deposit build up. You can either take out the face plate or remove the entire shower head fixture. It is an easy task as you just have to unscrew the shower head and twist it in a counter clockwise manner to get it out.
- The best way to clean a shower head is to soak the face plate in white vinegar for quite a few hours. Use enough vinegar and coarse salt to immerse the shower head completely. The vinegar helps to dissolve the lime deposits.
- After a few hours have passed take out the shower head and prick the holes with a toothpick to manually remove the dissolved deposits and debris. Then finally give it a good scrub with a brush to get it completely cleaned.
Worn out washer
The shower head leak can also be caused due to the rubber washer getting worn out. The washer suffers a crack due to daily use and water starts leaking from the cracks. Getting the rubber washer replaced will easily solve this problem.
Solution:-
- Turn off the water supply and determine which washer is leaking and needs to be replaced.
- Get a washer similar in size and diameter to the old one.
- Remove the faulty faucet or shower head by unscrewing it and replace the old washer with the new one and reassemble the parts again.
- Check to see if the problem has been solved.
Malfunctioning Diverter Valve
A diverter valve is that device which allows the water to move from the faucet to the shower head. Just like the clogging of the shower head holes, the diverter valve can also get clogged by lime and sediments. When the diverter valve is malfunctioning, it will lead to water leakage.
Solution:-
The solution to this problem is either to clean the diverter valve or to get it replaced. A badly damaged one should ideally be replaced with a new one.
- Firstly, turn off the water supply to the bathroom.
- Take out the faucet handle to reach the diverter valve. It is easy to unscrew the parts and find the diverter valve which is at times hidden under a cap.
- Unscrew the hex nut to dissemble the valve and get it cleaned or replaced. If it is too stuck due to lime build up, you can wrap a cloth soaked in vinegar for a few hours to dissolve the lime build up.
- When the diverter valve is taken out clean the device with a hard brush. You can also use a stiff old toothbrush dipped in white vinegar. It dissolves the sediments and gets the valve clean.
- Check out for cracks in the valve after it is dry. If there are cracks you better replace the valve with a new one. Otherwise you can just fix it and reassemble the parts.
Malfunctioning Cartridge Valve
One more reason why your shower head may be leaking is because of a malfunctioning cartridge valve. Replacing the faulty valve can get the problem solved.
Solution:-
- Shut off the water supply to the bathroom at first.
- Find out the screw of the faucet handle and unscrew it. You can then take out the handle.
- Now take out the stop tube, the cartridge retaining clip and lastly, the washer to expose the cartridge stem.
- Unscrew the hex nut covering the stem of the cartridge to remove it and replace it with a new cartridge. The new one must be identical to the old one in shape and size.
- Reassemble all the parts again to check if the problem has been solved.